
Before a child can start learning to write letters and understand what they mean, a number of other skills must be learned.
Pre-Writing Shapes
Being able to interpret, imitate and copy a design is important for learning writing skills. The pre-writing shapes below can help children to learn this.
The shapes are arranged in developmental order. If one is too difficult, go back to the previous one

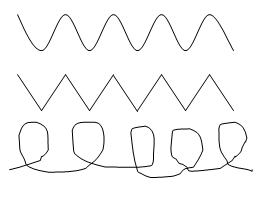
Pre-writing Patterns
Patterns like the ones below should be used to practice controlling the writing implement and developing fluency.
Multi-sensory Ideas for practicing drawing and recognising shapes and patterns
Use a mixture of small movements (e.g., using a pencil) and large movements using the whole upper limb (e.g., using a paintbrush on an easel.
When first starting to learn shapes and patterns, allow the child to trace over then – first with their fingers, then with a writing implement. Then ask them to copy it and finally practice independently.
Incorporating as many different sensory experiences as possible will help the movements and shapes become familiar and automatic. It also helps to motivate children!
Activity ideas:
- Use short stubby crayons which encourage a tripod grasp
- Try paper layered over coarse sand paper and use a crayon to trace the shape.
- Use chalk on a chalkboard, black paper or paving slabs. Try different lengths of chalk.
- Wet write using water using a decorator’s brush on walls and fences
- Stick lining paper on a wall and use pens or paint (with brush or use finger paint).
- Make a baton out of newspaper and ‘air write’ the shapes
- Try the above with eyes shut or a blind fold
- Draw the shapes on paper, lay tracing paper or greaseproof paper over the top and ask the child to trace the shape- first with his finger and then with a darker coloured crayon
- Use a wet finger or small piece of wet sponge on a blackboard
- Roll sausages in play dough and form the shapes
- Trace the shapes in a tray of dry pasta (small soup pasta works best) or rice
- Trace the shapes in scented hand cream or hair gel which has been smoothed out in a baking tray or similar
- Part fill a zip lock bag with coloured hair gel and trace the shapes through the hair gel
- If you have access to laminating sheets, iron the two long sides with an iron set at the cotton setting to about ½” in from the edge. Fill with 11/12 jars of hair gel (for an A3 sheet) as above. Smooth carefully out on a flat surface to get the air out. Be very careful not to get any gel on or too near the last 1” of the laminate. Seal to close with the iron as before. Use on a pale, plain flat surface to trace the shapes so they are slightly visible against the backdrop.
- Draw the shapes in damp sand
- Try a white board with thick markers
- Try Magic drawing pads where the page is impregnated with ink and the colour appears when painted with a wet brush or sponge.
- Write the shape on your child’s back and get him/her to shape match with a pre-drawn shape
- Glue the closed shapes (circle, square and triangle) in string onto paper as an outline, allow to dry and colour inside the lines
- Make a feely bag from a small drawstring bag and place pre-writing shapes in it – e.g., jam jar lid for a circle, the letter ‘X’ cut from stiff card or taken from a magnet letter set, a square of stiff card or relatively flat building block or lid, etc.
- Ask your child to place his/her hand in the bag and pull out a shape. Encourage them to match it to a drawn shape.
- Alternatively show your child a shape and ask him/her to find it without peeking
- You can also try placing one shape in the bag, feel it without looking, and without taking it out point to the matching drawn shape
- Try a vibrating pen to give more sensory feedback as the shapes are drawn
- Try the ‘Aqua Draw Mat’ from ELC or the ‘Super Scribbler’ – also ELC